
Contents
What is C the Signs?
C the Signs is a clinical system for healthcare professionals, to accelerate
earlier and faster cancer detection.
- Clinicians can identify patients at risk of cancer and refer them along the best pathway: be it a test, scan or urgent referral – all through C the Signs.
- Patients at risk of cancer are then automatically tracked and safety-netted on the C the Signs Practice Dashboard.
How does C the Signs work?
C the Signs is integrated with EMIS and is accessed through a desktop toolbar. There are 4 buttons on the toolbar.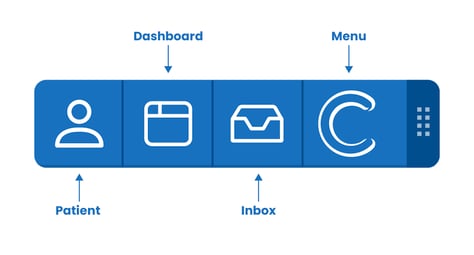
-
Patient
Access clinical decision support, cancer referral forms, patient information leaflets and safety-net FIT tests.
-
Dashboard
Automatically safety-net patients on a cancer pathway, track cancer care reviews and monitor live cancer data.
-
Inbox
Automated tracking of cancer referrals to help ensure they are sent through eRS.
-
Menu
Shrink the toolbar, access educational resources and support.
Get Started
See our guide explaining how to launch the C the Signs toolbar and create a user account by clicking here.Patient Button
Find helpful features through the patient button to help you assess a patient at risk of cancer and complete the associated paperwork if a referral is needed.
Click on the Patient Button and choose from the following drop down options.- Risk assessment
- Referral Forms
- FIT Safety-netting
- Resources

Risk Assessment
Use the risk assessment feature to access clinical decision support.
- Ensure all patients with suspected cancer are referred on the correct pathway, whether that be a test or referral.
- Support your management of patients with vague presenting symptoms.
Skip to the next section here, or continue for a step by step guide to risk assessment using C the Signs.
Video Guide
Watch our short video guide on how to complete a risk assessment or continue to read our step by step guide.
Step 1 : Open Risk Assessment Home Page
- Click on the first button of the C the Signs toolbar and select 'Risk Assessment'.

Step 2 : Select 'System' or 'Search'
- Click the 'System' button to assess your patient by body system.
- Or, click the 'Search' button to assess your patients based on symptoms, signs, risk factors and investigation results e.g. weight loss, anaemia.

- If you are assessing by 'System', select the relevant body system and enter the symptoms, signs, investigations, etc. that are relevant for your patient.
- If you are assessing by 'Search', the relevant body systems will already be selected. Enter any further clinical factors relevant for your patient.
 Step 3 : Review Recommendations
You will then be shown recommendations based on NICE guidelines and your local cancer pathways. Select recommendations to action or not action based on clinical judgment.

Step 4: Send Patient Information Leaflets
- Relevant patient information leaflets will appear below any recommendations or considerations.

- You can provide you patient with a leaflet through C the Signs by sending a text, email, or downloading and printing.
Step 5: Complete Referral Form
- If an urgent cancer referral has been actioned, you can complete the form by clicking on 'Proceed to referral from(s)' at the bottom of the page.
- Alternatively, you can proceed to the patient summary.
Step 6: Review, Save & Safety-Net
- Review your risk assessment and any referrals completed on the patient summary page.
- You can edit the clinical summary and choose which clinical codes are saved into the medical record.
- When you are happy click on 'Save to patient's notes and the practice dashboard'. The patient will now be safety-netted in the referral inbox and onto the C the Signs Dashboard. [add links out to referral inbox and dashboard]
Urgent cancer referrals must be sent through the e-Referral System (eRS) as per usual workflow. Any tests or investigations must be ordered through your local pathology or radiology service.
Referral Forms
Use this feature to complete urgent cancer referrals.
Skip to the next section here, or continue for a step by step guide on how to complete referral forms using C the Signs.
Video Guide
Watch our short video guide on how to complete an urgent cancer referral or continue to read our step by step guide.
Step 1: Open Referral Forms
- Click on the first button of the C the Signs toolbar and select ‘Referral Forms’.

Step 2: Select Form
- Select the referral form you need from the drop-down menu.

If there is more than one option for referral in your local area, switch between NHS Hospital Trusts at the top of the page to find the urgent cancer referral form you are looking for.
Step 3: Complete the Form
- The relevant referral form template will load. C the Signs will pull through relevant information from the patient’s notes into the form.
- Complete the form and add or edit clinical information as needed.
- Send a patient information leaflet to the patient by text, email or download & print.

- Once you have completed the form, select ‘Generate referral form’.
Some referral forms will contain mandatory fields, highlighted in pink. These must be completed before you can save the form into the notes.
Step 4: Review, Save & Safety-net
- Add any clinical information and choose which clinical codes are saved into the medical record.
- When you are happy click on 'Save to patient's notes and the practice dashboard'. The patient will now be safety-netted in the referral inbox and onto the C the Signs Dashboard.
Urgent cancer referrals must be sent through the e-Referral System (eRS) as per usual workflow.
FIT Safety-netting
Use this feature to safety-net FIT tests.
Skip to the next section here, or continue for a step by step guide on how to complete referral forms using C the Signs.
Video Guide
Watch our short video guide on how to use the FIT Safety-netting shortcut or continue to read our step by step guide.
Step 1: Click the Patient Button on the C the Signs toolbar
- Ensure you have the correct patient open on EMIS.
- Select FIT Safety-netting from the drop down menu.

Step 2: Send patient information leaflet
- You can provide the patient with a FIT information leaflet through C the Signs by sending a text, email, or downloading and printing.
Step 3: Review, save and safety-net
- To add any further clinical information click on the free text box.
- Choose which clinical codes are saved into the medical record.
- When you are happy click on 'Submit and send'. The patient will now be safety-netted on the C the Signs Dashboard, skip to this section here.

Step 4: FIT tests must be ordered through your local pathology service as per your usual workflow.
Resources
Use this feature to send patient information leaflets related to cancer.
- Our resource library includes urgent suspected cancer referral leaflets, cancer specific information, wellbeing guidance and community support.
Skip to the next section, or continue for a step by step guide on how to send leaflets using C the Signs.
Step 1: Click on the Patient Button
- Ensure you have the correct patient open on EMIS.
- Select Resources from the drop down menu.
Step 2: Send patient information leaflet
- Use the search box or click on the relevant category to find the leaflet you would like to send.
- You can provide the patient with a leaflet through C the Signs by sending a text, email, or downloading and printing.
Dashboard
Use this feature to ensure a robust safety netting process for patients on suspected cancer pathways.
- Maintain a complete cancer register. Easily track 3 and 12-month cancer care reviews and complete them using in-built templates.
- Real-time cancer data to help you review your current cancer performance and guide improvement activity.
Skip to the next section here, or continue for a short guide on how to use the C the Signs Dashboard. For more detailed information on using the dashboard, click here.
Step 1: Click the Dashboard Button on the C the Signs toolbar
- The dashboard will default to the Active Tab. Click on the individual tabs at the top of the screen to navigate between the different areas of the dashboard.
Active Tab
- Clinicians automatically safety-net patients to the Active Tab when using the C the Signs risk assessment tool, urgent cancer referrals forms and FIT safety-net feature.
- Each patient will have a dedicated entry, where all the information needed to track cancer related investigations and referrals can be found. Click here for more information on how to outcome medical plans on the dashboard.
- Once all medical plans have been actioned, the patient will move to either the 'Cancer Confirmed' or 'Cancer Excluded' board.
FIT View
- The Active Tab has a FIT view option. Use this to filter patients on a FIT pathway and track if the IIF standard is being met.
For more information, see our FIT View Guide.
Cancer Confirmed Tab
- Keep an up to date register of patients with cancer in your practice.
- Patients will automatically be added to this tab when you record a cancer diagnosis in the Active Tab.
- Complete a 3 and 12 month Cancer Care Review using a C the Signs template to fulfil QOF requirements and improve the holistic management of your cancer patients.
- Any Cancer Care Reviews completed in EMIS will be reflected on the tab after automatically updating overnight.
For more information, see our Cancer Confirmed Board Guide.
Practice Data Tab
- You can view your live practice and PCN cancer performance data here.
- This data can be used to drive improvement in cancer care.
- Record practice and PCN reflections on your cancer performance and track any quality improvement targets.
For more information, see our Practice Data Board Guide.
Inbox
Use this feature to help ensure all new referrals created using C the Signs are sent through eRS.
- Any referral created using C the Signs and saved into the medical record will automatically be tracked to the Inbox.
Skip to the next section here. Continue to read a step by step guide on how to track new referrals using the C the Signs Inbox.
Step 1: Click the Inbox Button on the C the Signs toolbar

- You will see a list of all the new urgent cancer referrals created using C the Signs.
- Notifications are disabled for clinical staff. To change this, click on the 'Enable' option at the bottom right of the inbox drop down list.
- When notifications are enabled, you will see a pop up above the C the Signs toolbar informing you when a new referral is created.
Step 2: How to clear the inbox
- Once a referral has been sent through eRS, find the relevant patient in the inbox and tick the box on the left.

- When a referral has been marked as sent, it will no longer be found in the Inbox when it is next opened.
- Referrals marked as sent will also be reflected on the C the Signs Dashboard to ensure continuity of the safety-net.
- Who is responsible for this step will depend on the current workflow in your practice. Usually, the staff member responsible for sending eRS referrals will keep the C the Signs Inbox up to date.
Menu Button
- Access different practices, our educational resources and support.
